Ever wondered how top Roblox games achieve their stunning custom visuals and unique assets? The secret often lies with Blender, a powerful, free 3D modeling software. This comprehensive guide walks you through everything you need to know about how to download Blender for Roblox, setting up your environment, and starting your journey into advanced game development. We will cover the installation process, essential configurations for seamless integration with Roblox Studio, and fundamental steps to create and import your very own custom 3D models. Whether you are a budding game developer, an experienced creator looking to enhance your Roblox projects, or simply curious about bringing your imaginative designs to life, this guide provides all the navigational and informational support you need. Learn why Blender is an indispensable tool for serious Roblox creators, how to leverage its capabilities, and unlock new levels of creativity in your game designs today. This article is your gateway to mastering custom content creation for the vibrant Roblox platform.
Hey friend! So you're curious about bringing your creative visions to life in Roblox using a powerful tool like Blender? That's awesome! It can feel a little intimidating at first, wondering how all those amazing custom assets you see in games actually get there. Well, you're in luck because this isn't just another guide; it's the ultimate living FAQ, constantly updated to ensure you've got the most current info on downloading Blender for Roblox and mastering custom content. We're going to break down all the big questions, from getting started to advanced tricks, making sure you feel confident and ready to create something truly spectacular. Think of this as your personal roadmap to becoming a Roblox modeling maestro! Let's dive in and demystify the process together.
We've gathered insights from countless creators and scoured the deepest corners of the internet to bring you the answers to questions that really matter. This resource is designed to be super friendly, easy to understand, and packed with practical advice. Whether you're a complete beginner just starting out or an experienced developer looking for optimization tips, you'll find valuable nuggets here. We'll cover everything from the initial download and setup to understanding file formats, materials, and even how to troubleshoot common issues. Our goal is to empower you with the knowledge to make your Roblox games shine with custom Blender creations. No more guessing, just clear, actionable steps to elevate your game development.
Most Asked Questions about How to Download Blender Roblox
Beginner Questions
How do I download Blender for free to use with Roblox Studio?
You can download Blender completely free from its official website, blender.org. Choose the installer compatible with your operating system (Windows, macOS, Linux). The installation is standard; just follow the prompts. Blender is open-source and perfect for creating custom 3D models and animations for your Roblox games without any cost, empowering your creative journey. This official download ensures you get the latest stable version and full functionality.
What is Blender used for in Roblox game development?
Blender is primarily used for creating detailed custom 3D models, characters, props, and environments for Roblox games. Its advanced modeling, sculpting, texturing, and animation tools allow developers to craft unique assets far beyond Roblox Studio's native capabilities. These assets are then exported and imported into Roblox Studio to enrich game worlds, provide custom player experiences, and help games stand out visually on the platform.
Getting Blender
What are the official steps to install Blender after downloading the installer?
After downloading the Blender installer from blender.org, locate the downloaded file and double-click to run it. Follow the on-screen prompts, which typically involve accepting the license agreement, choosing an installation location, and clicking 'Install.' Once the installation completes, you can launch Blender from your desktop shortcut or program menu. This straightforward process ensures a proper setup, getting you ready to start creating for Roblox quickly and efficiently.
Blender Basics for Roblox
How do I start modeling a simple object in Blender for Roblox?
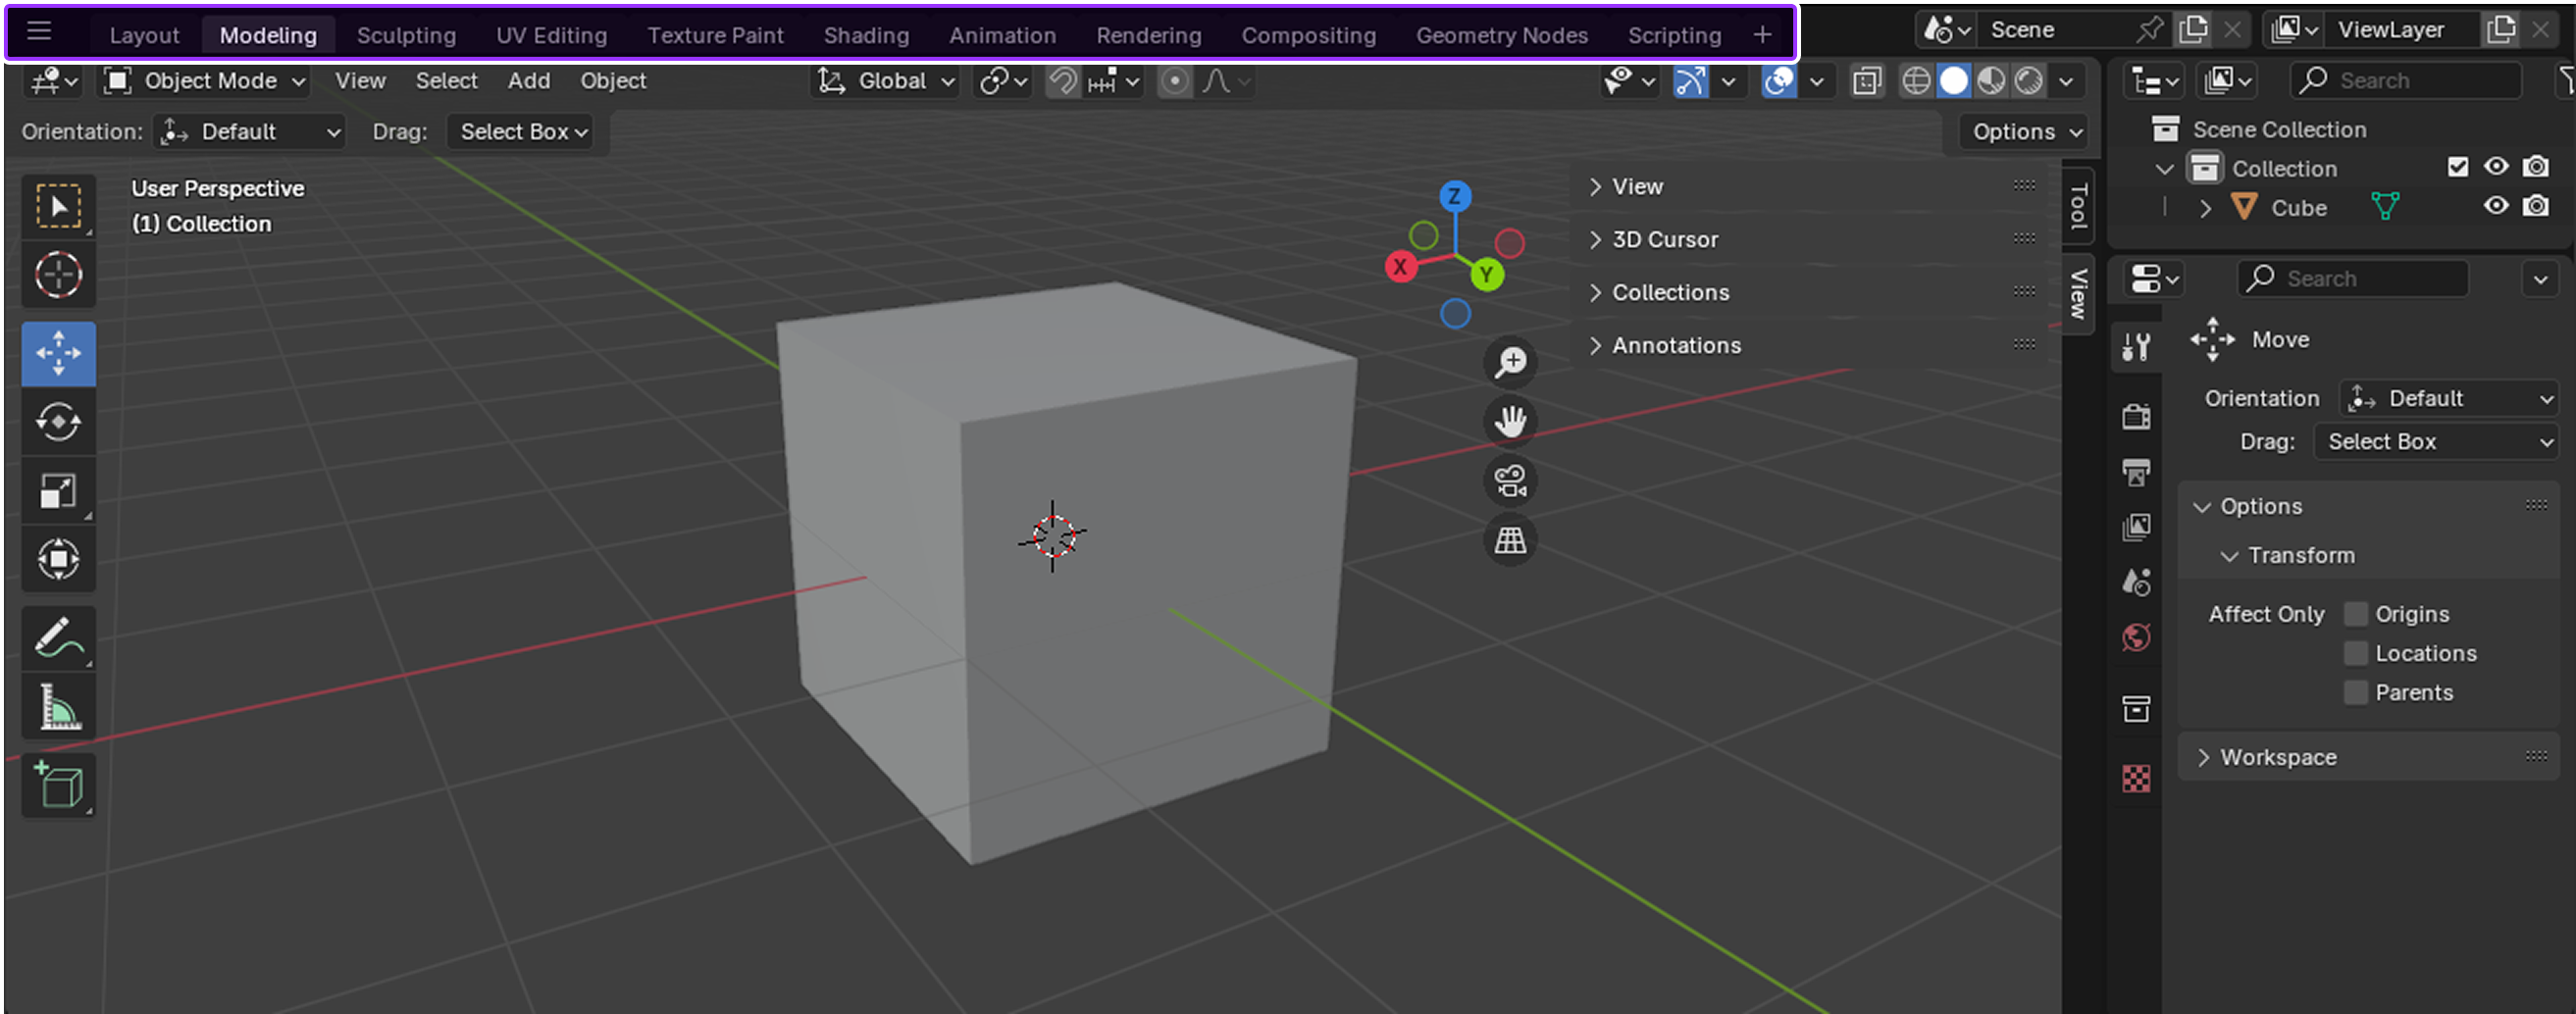
To start modeling in Blender for Roblox, open a new general project. Select the default cube, press 'Tab' to enter Edit Mode, and use tools like 'Extrude' (E), 'Move' (G), 'Scale' (S), and 'Rotate' (R) to manipulate vertices, edges, and faces. Keep your models simple and low-poly initially for optimal Roblox performance. Focus on fundamental shape manipulation to build your first custom asset, practicing regularly to build muscle memory.
Exporting Models to Roblox
What are the optimal export settings in Blender for Roblox Studio?
For optimal export, use FBX (.fbx) format. In export settings, ensure 'Selected Objects' is checked if applicable, and uncheck 'Camera' and 'Lamp'. Crucially, set 'Forward' to '-Z Forward' and 'Up' to 'Y Up' under 'Transform' for correct orientation in Roblox. Always apply transforms (Ctrl+A -> All Transforms) in Blender before exporting to prevent scaling or rotation issues. These settings ensure smooth, consistent imports.
Importing into Roblox Studio
How do I import a Blender FBX model into Roblox Studio?
In Roblox Studio, go to the 'Model' tab and click '3D Importer'. Select your exported FBX file. Review the import settings, adjusting scale or position if needed. Click 'Import' to bring your model into the workspace. It will appear as a `MeshPart` or `Model`. You can then position, scale, and apply materials or textures to it within your game. This process efficiently brings your custom creations into your Roblox environment.
Texturing and Materials
Can I use PBR textures created in Blender with my Roblox models?
Yes, Roblox Studio fully supports Physically Based Rendering (PBR) textures created in Blender. You'll need to export separate texture maps (Albedo/Diffuse, Normal, Metallic, Roughness) from Blender as image files. In Roblox Studio, import these textures and apply them to a `SurfaceAppearance` instance on your `MeshPart`. This allows your Blender models to achieve highly realistic and visually stunning material properties within your Roblox games.
Animation for Roblox
How do I animate a character in Blender and import it into Roblox Studio?
Animate your character in Blender by rigging it with an armature and then creating keyframe animations. Export the rigged character and its animations as a single FBX file, ensuring 'Armature' and 'Animation' options are selected during export. In Roblox Studio, import the FBX; the animation will appear as an `Animation` asset. You can then use the Animation Editor or scripts to play these custom animations on your Roblox character models.
Troubleshooting Common Issues
Why does my Blender model appear with incorrect scale or rotation in Roblox Studio?
This common issue is usually due to unapplied transforms in Blender. Before exporting, select your model in Object Mode, press `Ctrl+A`, and choose 'All Transforms'. Also, ensure your FBX export settings have 'Forward' set to '-Z Forward' and 'Up' to 'Y Up'. Adjusting the scale factor during import in Roblox Studio's 3D Importer can also correct discrepancies. Consistently applying these steps prevents frustrating scale and rotation problems.
Tips, Tricks, and Community
What are some tips for optimizing Blender models for better Roblox performance?
For optimal Roblox performance, always aim for low-polygon models by using techniques like decimation or manual retopology. Utilize texture atlases to combine multiple textures into one, reducing draw calls. Break down large models into smaller `MeshParts` to aid Roblox's streaming system. Remove unnecessary hidden geometry or data before exporting. Regularly test your models in Roblox Studio to monitor their impact on game performance, ensuring a smooth player experience.
Still have questions? The Roblox Developer Forum and communities on YouTube like TheDevKing and AlvinBlox are fantastic resources for more specific queries and advanced tutorials. Keep exploring and creating!
Hey there, fellow creators! Ever found yourself playing an incredible Roblox game and wondering, "How do people make those super detailed characters, intricate buildings, or unique props that just pop?" I totally get it. Many aspiring game developers and even seasoned builders grapple with this very question. The answer, more often than not, involves a fantastic piece of software called Blender. If you've been curious about how to download Blender for Roblox and elevate your game-making skills, you've landed in the perfect spot. We're going to dive deep into making your Roblox worlds truly stand out with custom 3D content.
Understanding the synergy between Blender and Roblox Studio is really key. It's not just about downloading; it's about integrating a powerful tool into your creative workflow. Why is this so crucial? Because it opens up a universe of possibilities beyond what Roblox Studio's native tools can offer alone. Think of it as upgrading your entire creative arsenal, allowing you to craft incredibly unique and professional-looking assets for your games. This guide will ensure you're fully equipped to start that exciting journey, making sure your download and setup process is as smooth as possible.
Blender and Roblox Studio Integration: Bridging Your Creative Worlds
When we talk about Roblox Studio Integration, we're discussing how Blender assets seamlessly connect with Roblox Studio, significantly enhancing your game development workflows. This is incredibly important because it bridges two powerful platforms. Blender provides the advanced modeling capabilities, while Roblox Studio offers the game engine and publishing platform. The integration allows creators to design complex meshes in Blender and then bring them directly into their Roblox experiences. This workflow is where your wildest ideas truly begin to take shape.
Mastering 3D Modeling for Roblox: Crafting Your Vision
Next up is 3D Modeling for Roblox, which focuses on the creative aspect, detailing how users leverage Blender's comprehensive tools to craft custom models, characters, and environments specifically for their Roblox games. How does it work? By exporting models in compatible formats like FBX or OBJ. Blender provides a professional-grade environment for sculpting, texturing, and rigging, giving you unparalleled control over every detail of your creations. This is where you can truly express your artistic vision, moving beyond basic shapes to intricate, lifelike objects that define your game's aesthetic.
Unleashing Custom Asset Creation: Your Unique Signature
Let's talk about Custom Asset Creation Roblox, which highlights the unique content users can produce, from bespoke clothing designs to intricate architectural structures, giving their Roblox experiences a distinct look and feel. Who truly benefits from this? Every creator wanting their game to stand out in the crowded Roblox marketplace. Custom assets are what transform a generic game into an unforgettable experience. They allow you to build brand recognition for your creations, ensuring players immediately recognize your unique artistic style. This level of customization is what sets apart the most successful games on the platform.
Blender to Roblox Export Guide: Your Path to Seamless Transfer
Our focus then shifts to the Blender to Roblox Export Guide, which provides step-by-step instructions on the technical process of preparing and transferring models from Blender into Roblox, addressing common pitfalls along the way. What's the best way to ensure success? Following specific export settings carefully. This part can seem daunting at first, but with the right guidance, it becomes second nature. Understanding proper scaling, origin points, and file formats is crucial for your models to appear correctly within Roblox Studio, ensuring your hard work translates perfectly into the game world.
Free Game Development Tools: Empowering Every Creator
Finally, let's appreciate Free Game Development Tools. This emphasizes that both Blender and Roblox Studio are free platforms, making high-quality game creation accessible to everyone without significant upfront investment. Why is it free? To empower a broad and diverse creator community. This accessibility is a game-changer for independent developers and hobbyists who might not have the budget for expensive commercial software. It means anyone with an idea and a computer can start creating professional-grade content, democratizing game development and fostering incredible innovation across the platform.
So, you're ready to get started. Great! This guide will cover everything from the initial download to understanding how to smoothly integrate Blender into your Roblox workflow. We’ll make sure you understand the 'why' behind each step, not just the 'how.' You've got this, and together we'll unlock a new realm of creativity for your Roblox projects!
Getting Started: Your First Steps with Blender for Roblox
Jumping into Blender for Roblox can feel like a big leap, but trust me, it's totally worth it. The first step is always the download, and then understanding the basics of how these two powerful platforms interact. We'll demystify the process and give you a clear roadmap. Remember, every expert started as a beginner, so be patient with yourself!
Downloading and Installing Blender
To begin your journey, you'll need to download Blender. This amazing software is completely free and open-source, making it accessible to everyone. You can find the latest stable version on the official Blender website, blender.org. Make sure to download the installer that matches your operating system, whether it's Windows, macOS, or Linux. The installation process is straightforward, much like any other application you'd install. Just follow the on-screen prompts, agreeing to the terms and conditions, and choosing your installation directory. It's a quick and simple process that will have you up and running in no time. Once installed, launch Blender to ensure everything is working correctly. It might seem like a lot of buttons at first, but don't worry, we'll navigate it together!
Connecting Blender to Roblox Studio
Connecting Blender to Roblox Studio isn't a direct 'plugin' sort of connection but rather a seamless workflow using file exports and imports. You'll primarily be exporting your 3D models from Blender as an FBX or OBJ file. Roblox Studio then allows you to import these files directly into your game. Understanding this pipeline is crucial. It ensures your meticulously crafted models appear exactly as intended within your Roblox experience. This indirect connection is highly effective, enabling the strengths of both programs to shine without complex middleware. It's about knowing the right file formats and export settings, which we'll cover in detail.
The Core of Creation: Mastering Blender for Roblox Assets
Once Blender is installed, the real fun begins: creating! But before you start sculpting masterpieces, it's helpful to grasp the fundamental concepts of 3D modeling within Blender, especially as they pertain to Roblox. Optimizing your models for the Roblox engine is key for performance and visual fidelity. We'll explore mesh optimization, material setup, and proper scaling to ensure your assets look great and run smoothly in your games.
Basic 3D Modeling Concepts for Roblox
When you're creating assets in Blender for Roblox, a few core concepts are essential. You'll be working with vertices, edges, and faces to build your meshes. Understanding how to manipulate these elements is fundamental for creating any 3D object. Keep in mind that Roblox works best with efficient, low-polygon models, so optimizing your mesh is crucial for game performance. You want your assets to look good without bogging down the game. This means learning techniques like retopology and using modifiers carefully to maintain a clean mesh. Don't worry, these skills come with practice, and Blender offers fantastic tools to help you along the way.
Applying Materials and Textures for Roblox
Materials and textures are what bring your models to life visually. In Blender, you'll set up your materials using the Principled BSDF shader, which is highly versatile. For Roblox, you'll often bake textures or use simple image textures that can be applied within Roblox Studio. It's important to understand how to properly UV unwrap your models in Blender so that textures map correctly. Roblox Studio handles PBR (Physically Based Rendering) materials, meaning you can achieve really stunning visual effects if you prepare your textures correctly in Blender. Think about diffuse, normal, roughness, and metallic maps to give your assets a realistic feel. This step truly elevates the visual quality of your custom content.
Advanced Techniques: Elevating Your Roblox Creations
Ready to push the boundaries of your Roblox game? Advanced Blender techniques can help you create truly dynamic and interactive assets. From sophisticated animations to intricate rigging, these skills will set your creations apart. We'll touch on how to achieve these effects and maintain performance, ensuring your games remain immersive and responsive.
Rigging and Animation for Roblox Characters
Rigging and animation are where your Roblox characters truly come alive. In Blender, rigging involves creating an armature (a skeleton) that allows you to pose and animate your 3D models. For Roblox, understanding proper bone hierarchy and naming conventions is vital. You'll animate your character in Blender using keyframes, creating fluid movements and expressions. Once animated, you can export these animations as FBX files and import them directly into Roblox Studio, where they can be used with your custom characters. This process, while complex, allows for unparalleled character customization and dynamic gameplay. It's a powerful way to add personality and action to your Roblox experiences.
Optimizing Models for Roblox Performance
Performance optimization is paramount in Roblox, especially with custom Blender models. High-polygon meshes, excessive materials, or poorly optimized textures can significantly impact game performance, leading to lag. In Blender, focus on reducing polygon count using techniques like decimation or retopology. Combine textures into atlases to minimize draw calls, and ensure your UV maps are efficient. For character rigs, keep the bone count reasonable. When exporting, choose the FBX format and use appropriate settings to ensure only necessary data is transferred. Regularly test your models in Roblox Studio to monitor performance. A well-optimized model not only looks great but also contributes to a smooth, enjoyable player experience. This attention to detail makes a huge difference in the overall quality of your game.
Beginner / Core Concepts
- Q: What exactly is Blender and why should I use it for my Roblox creations?
A: Blender is a powerful, free, and open-source 3D creation suite. You should absolutely consider using it for Roblox because it allows you to create highly detailed, unique 3D models and animations that go far beyond what Roblox Studio's built-in tools can offer. It's your ticket to making truly distinctive assets, from custom characters and props to intricate environments, giving your games a professional and personalized touch. I get why this might seem like a big jump from just using Studio, but the creative freedom Blender provides is immense. It really helps your vision come to life in a way that stands out from the crowd. You've got this!
- Q: Is Blender truly free to download and use for commercial Roblox games?
A: Yes, Blender is 100% free and open-source under the GNU General Public License. This means you can download it, use it for personal projects, educational purposes, and even for creating assets for commercial Roblox games without any licensing fees whatsoever. It's an incredible advantage for developers of all levels, removing a significant financial barrier to entry for high-quality 3D content creation. This one used to trip me up too, wondering if there was a catch, but there really isn't! The community-driven nature of Blender ensures it remains accessible and powerful, evolving constantly with user contributions. Go ahead and download it; your wallet will thank you!
- Q: What's the best way to get started with Blender if I'm a complete beginner, specifically for Roblox?
A: The absolute best way to start is by downloading Blender from blender.org and then focusing on basic navigation and modeling tutorials that are specifically geared towards game assets. Look for beginner-friendly YouTube series that cover fundamental tools like extrude, loop cut, and scaling. Don't try to learn everything at once. Focus on simple objects first, like a barrel or a basic house, and then practice exporting them as FBX files to Roblox Studio. There are tons of fantastic free resources online tailored for Roblox creators, which can really accelerate your learning curve. Start small, build confidence, and you'll be amazed at your progress. You've got this!
- Q: What are the minimum system requirements to run Blender smoothly for Roblox asset creation?
A: For basic Blender use and creating assets for Roblox, a decent modern computer should suffice. You'll ideally want at least 8GB of RAM (16GB is highly recommended), a 64-bit multi-core processor (Intel i5/Ryzen 5 or better), and a dedicated graphics card with at least 2GB VRAM (NVIDIA GTX 1050 or AMD RX 560 equivalent or better) to handle 3D viewport rendering smoothly. While integrated graphics can work for very simple models, a dedicated GPU significantly improves performance and experience. A solid-state drive (SSD) is also a huge plus for faster loading times. No need for a supercomputer right out of the gate, but these specs provide a comfortable creative environment. Try this tomorrow and let me know how it goes!
Intermediate / Practical & Production
- Q: How do I properly export my Blender models so they import correctly into Roblox Studio?
A: To export Blender models for Roblox, first ensure your model is clean: apply all transforms (Ctrl+A -> All Transforms), remove duplicate vertices (Mesh -> Clean Up -> Merge By Distance), and check normals (Overlay -> Face Orientation). Then, go to File -> Export -> FBX (.fbx). In the export settings, choose 'Selected Objects' if you only want to export specific items. Under 'Object Types', uncheck 'Camera' and 'Lamp'. For 'Scale', keep it at 1.0 or adjust based on your needs, but consistency is key. Crucially, set 'Forward' to '-Z Forward' and 'Up' to 'Y Up' for correct orientation in Roblox. This alignment often trips people up, but it makes a world of difference. Always test your imports; you'll quickly get a feel for what works best. You've got this!
- Q: What's the best file format to use when exporting from Blender to Roblox, and why?
A: The **FBX (.fbx)** format is generally the best and most recommended choice when exporting from Blender to Roblox Studio. Why? Because FBX is a robust format that supports not just mesh data but also crucial information like materials, textures (though often better imported separately), and, most importantly, animations and rigging. This makes it ideal for complex assets like characters or animated props. While OBJ (.obj) can work for static meshes, it's less versatile and doesn't carry animation data. Sticking with FBX ensures a smoother workflow for dynamic assets and maintains more integrity of your Blender scene in Roblox. I get why this confuses so many people, as there are many formats, but FBX is truly the standard here. Try this tomorrow and let me know how it goes.
- Q: How do I handle textures and materials in Blender so they look good when imported into Roblox Studio?
A: Handling textures for Roblox involves a few steps. First, ensure your model is properly UV unwrapped in Blender – this maps the 2D textures onto your 3D model. For materials, use Blender's Principled BSDF shader to create your desired look. You'll typically bake complex textures (like ambient occlusion or combined color maps) into single image files if Roblox doesn't support a direct material setup. Alternatively, export separate texture maps (albedo/diffuse, normal, metallic, roughness) and apply them to a `SurfaceAppearance` or `PBRMaterial` instance in Roblox Studio. Remember that Roblox supports physically based rendering (PBR), so taking the time to create good quality PBR textures in Blender will make your assets truly shine. It's a bit of an art and a science, but immensely rewarding. You've got this!
- Q: Can I import animated characters from Blender into Roblox Studio, and how difficult is it?
A: Yes, you absolutely can import animated characters from Blender into Roblox Studio! It's a powerful way to bring your creations to life. The process involves rigging your character in Blender, then creating animations using keyframes. When exporting, you'll use the FBX format, making sure to include the armature and animation data. Once in Roblox Studio, you can import the FBX as an `Animation` asset or a `Model`. While it sounds complex, it's totally achievable with practice. There are fantastic tutorials that break down Blender rigging and animation for Roblox step-by-step. I know it can seem daunting at first, but with a bit of dedication, you'll be seeing your custom characters move in no time. You've got this!
- Q: What are common pitfalls when importing Blender models into Roblox, and how can I avoid them?
A: Common pitfalls include incorrect scaling, flipped normals, models appearing inside out, or missing textures. To avoid these, always apply transforms (Ctrl+A -> All Transforms) in Blender before exporting. Check your model's face orientation (Overlay -> Face Orientation) to ensure all faces are blue, indicating correct normals; if red, flip them (Alt+N -> Flip). Use FBX export settings with '-Z Forward' and 'Y Up'. For scaling, remember that Roblox units are studs, and a common practice is to scale your Blender models appropriately before export, perhaps by a factor of 0.01 if your Blender scene is in meters and you want 1 unit to be 1 stud. Consolidate textures where possible or handle them separately in Studio. Regular testing in Studio after each export helps catch issues early. These small checks save huge headaches later. Try this tomorrow and let me know how it goes.
- Q: Are there any Blender add-ons or plugins that are particularly useful for Roblox developers?
A: Absolutely! While not strictly 'plugins' that directly link Blender to Roblox, there are several general Blender add-ons that significantly enhance a Roblox developer's workflow. The built-in **Mesh: LoopTools** is fantastic for cleaning up geometry and creating smooth surfaces. **F2** helps with efficient face creation. For creating tileable textures, an add-on like **Texture Atlas** can be very useful. Some developers also use add-ons for PBR texture creation or baking tools to optimize their assets. The **Blender to Roblox Plugin** is a popular community-made tool that simplifies the export process by automating many settings and even has features for importing Roblox meshes back into Blender. Exploring these can seriously streamline your creation process. I get why this confuses so many people, as there are so many tools, but these few really make a difference. You've got this!
Advanced / Research & Frontier
- Q: How can I implement custom physics and collision meshes for Blender models in Roblox Studio?
A: Implementing custom physics and collision meshes for Blender models in Roblox Studio is a fantastic way to optimize performance and ensure accurate interactions. Instead of letting Roblox calculate complex collisions on your high-detail mesh, you create a simplified, invisible mesh in Blender specifically for collision. Export this simplified mesh alongside your visual model, using a distinct naming convention (e.g., `_collision`). In Roblox Studio, you'd make this collision mesh `CanCollide` and `Anchored` (if stationary) and ensure its `Transparency` is 1.0, while setting your visual mesh's `CanCollide` to `false`. This approach significantly reduces the computational load, especially for intricate models. It's a bit more work up front, but the performance gains are absolutely worth it for complex environments or interactive objects. You've got this!
- Q: What are best practices for creating PBR (Physically Based Rendering) textures in Blender for Roblox?
A: Creating PBR textures for Roblox in Blender involves generating or painting several specific texture maps: Albedo (color), Normal (for surface detail), Metallic (for metallic surfaces), and Roughness (for how shiny a surface is). Blender's Cycles or Eevee render engines are excellent for previewing these. Ensure your UV maps are clean and non-overlapping. Export these individual texture maps as separate image files (PNG is common). In Roblox Studio, you'll import these textures and apply them to a `SurfaceAppearance` instance on your `MeshPart`. Using a program like Substance Painter or even Blender's internal texture painting can help create high-quality PBR maps. The key is consistent lighting during baking and accurate material values. This one used to trip me up too, trying to get the right look, but careful map creation is everything. Try this tomorrow and let me know how it goes.
- Q: How do I optimize really complex Blender scenes or models to run smoothly in large Roblox experiences?
A: Optimizing complex Blender scenes for large Roblox experiences is critical for preventing lag. Start with aggressive polygon reduction using decimate modifiers or manual retopology, aiming for the lowest poly count that still retains visual fidelity. Utilize texture atlases by combining multiple small textures into one larger image to reduce draw calls. Use instancing in Blender where appropriate for repetitive objects. Break down massive models into smaller, manageable `MeshParts` that can be loaded more efficiently by Roblox's streaming system. Implement level of detail (LOD) if possible by creating simpler versions of models that appear at a distance. Don't forget to remove hidden geometry or unnecessary data before exporting. It's a constant balance between visual quality and performance, but these steps make a huge difference. You've got this!
- Q: Can Blender be used for advanced character rigging and custom inverse kinematics (IK) for Roblox avatars?
A: Yes, Blender is incredibly capable for advanced character rigging and creating custom inverse kinematics (IK) for Roblox avatars. You can build complex bone structures, set up custom controls, and implement IK solvers to make animation much more intuitive and realistic. While Roblox Studio has its own rigging capabilities, using Blender allows for far greater precision and sophistication in your character's skeletal setup. You'll export your fully rigged and weighted mesh, complete with its armature, via FBX. In Roblox Studio, you might still need to connect the animation data and sometimes even rebuild constraints for full functionality, but the core rig created in Blender provides a powerful foundation for dynamic custom characters. It requires patience and a good understanding of Blender's rigging tools, but the results are truly outstanding. You've got this!
- Q: What are the best resources for learning advanced Blender techniques specifically for Roblox game development?
A: For advanced Blender techniques tailored to Roblox, you'll want to tap into a mix of resources. YouTube channels like TheDevKing, AlvinBlox, and other dedicated Roblox development communities often feature tutorials on advanced Blender workflows. Beyond Roblox-specific content, general Blender channels like Blender Guru or Grant Abbitt provide foundational skills that are invaluable. Also, check out the official Roblox Developer Forum; many experienced creators share advanced tips and techniques there. Online courses on platforms like Udemy or Skillshare, if they cover game asset creation, can also be a goldmine. Don't shy away from Blender's official documentation and community forums either; they're packed with solutions. It's about combining general 3D knowledge with Roblox's specific requirements. You've got this!
Quick Human-Friendly Cheat-Sheet for This Topic
- Download Blender Officially: Always get Blender from blender.org – it's free and safe!
- Use FBX for Exports: Stick to FBX (.fbx) for exporting models; it handles meshes, animations, and rigs best for Roblox.
- Apply Transforms Before Export: In Blender, hit Ctrl+A and choose 'All Transforms' to prevent weird scaling or rotation issues in Roblox.
- Check Your Normals: Make sure all faces are oriented correctly (blue side out!) in Blender before exporting to avoid inside-out models.
- Keep it Optimized: Aim for lower polygon counts and efficient textures for better performance in your Roblox games.
- UV Unwrap Everything: Properly UV unwrap your models in Blender so textures look perfect in Roblox.
- Test, Test, Test: Always import and test your Blender assets in Roblox Studio regularly to catch problems early!
A: Blender is a powerful, free, and open-source 3D creation suite. You should absolutely consider using it for Roblox because it allows you to create highly detailed, unique 3D models and animations that go far beyond what Roblox Studio's built-in tools can offer. It's your ticket to making truly distinctive assets, from custom characters and props to intricate environments, giving your games a professional and personalized touch. I get why this might seem like a big jump from just using Studio, but the creative freedom Blender provides is immense. It really helps your vision come to life in a way that stands out from the crowd. You've got this!
A: Yes, Blender is 100% free and open-source under the GNU General Public License. This means you can download it, use it for personal projects, educational purposes, and even for creating assets for commercial Roblox games without any licensing fees whatsoever. It's an incredible advantage for developers of all levels, removing a significant financial barrier to entry for high-quality 3D content creation. This one used to trip me up too, wondering if there was a catch, but there really isn't! The community-driven nature of Blender ensures it remains accessible and powerful, evolving constantly with user contributions. Go ahead and download it; your wallet will thank you!
A: The absolute best way to start is by downloading Blender from blender.org and then focusing on basic navigation and modeling tutorials that are specifically geared towards game assets. Look for beginner-friendly YouTube series that cover fundamental tools like extrude, loop cut, and scaling. Don't try to learn everything at once. Focus on simple objects first, like a barrel or a basic house, and then practice exporting them as FBX files to Roblox Studio. There are tons of fantastic free resources online tailored for Roblox creators, which can really accelerate your learning curve. Start small, build confidence, and you'll be amazed at your progress. You've got this!
A: For basic Blender use and creating assets for Roblox, a decent modern computer should suffice. You'll ideally want at least 8GB of RAM (16GB is highly recommended), a 64-bit multi-core processor (Intel i5/Ryzen 5 or better), and a dedicated graphics card with at least 2GB VRAM (NVIDIA GTX 1050 or AMD RX 560 equivalent or better) to handle 3D viewport rendering smoothly. While integrated graphics can work for very simple models, a dedicated GPU significantly improves performance and experience. A solid-state drive (SSD) is also a huge plus for faster loading times. No need for a supercomputer right out of the gate, but these specs provide a comfortable creative environment. Try this tomorrow and let me know how it goes!
Intermediate / Practical & Production
- Q: How do I properly export my Blender models so they import correctly into Roblox Studio?
- Q: What's the best file format to use when exporting from Blender to Roblox, and why?
- Q: How do I handle textures and materials in Blender so they look good when imported into Roblox Studio?
- Q: Can I import animated characters from Blender into Roblox Studio, and how difficult is it?
- Q: What are common pitfalls when importing Blender models into Roblox, and how can I avoid them?
- Q: Are there any Blender add-ons or plugins that are particularly useful for Roblox developers?
A: To export Blender models for Roblox, first ensure your model is clean: apply all transforms (Ctrl+A -> All Transforms), remove duplicate vertices (Mesh -> Clean Up -> Merge By Distance), and check normals (Overlay -> Face Orientation). Then, go to File -> Export -> FBX (.fbx). In the export settings, choose 'Selected Objects' if you only want to export specific items. Under 'Object Types', uncheck 'Camera' and 'Lamp'. For 'Scale', keep it at 1.0 or adjust based on your needs, but consistency is key. Crucially, set 'Forward' to '-Z Forward' and 'Up' to 'Y Up' for correct orientation in Roblox. This alignment often trips people up, but it makes a world of difference. Always test your imports; you'll quickly get a feel for what works best. You've got this!
A: The **FBX (.fbx)** format is generally the best and most recommended choice when exporting from Blender to Roblox Studio. Why? Because FBX is a robust format that supports not just mesh data but also crucial information like materials, textures (though often better imported separately), and, most importantly, animations and rigging. This makes it ideal for complex assets like characters or animated props. While OBJ (.obj) can work for static meshes, it's less versatile and doesn't carry animation data. Sticking with FBX ensures a smoother workflow for dynamic assets and maintains more integrity of your Blender scene in Roblox. I get why this confuses so many people, as there are many formats, but FBX is truly the standard here. Try this tomorrow and let me know how it goes.
A: Handling textures for Roblox involves a few steps. First, ensure your model is properly UV unwrapped in Blender – this maps the 2D textures onto your 3D model. For materials, use Blender's Principled BSDF shader to create your desired look. You'll typically bake complex textures (like ambient occlusion or combined color maps) into single image files if Roblox doesn't support a direct material setup. Alternatively, export separate texture maps (albedo/diffuse, normal, metallic, roughness) and apply them to a `SurfaceAppearance` or `PBRMaterial` instance in Roblox Studio. Remember that Roblox supports physically based rendering (PBR), so taking the time to create good quality PBR textures in Blender will make your assets truly shine. It's a bit of an art and a science, but immensely rewarding. You've got this!
A: Yes, you absolutely can import animated characters from Blender into Roblox Studio! It's a powerful way to bring your creations to life. The process involves rigging your character in Blender, then creating animations using keyframes. When exporting, you'll use the FBX format, making sure to include the armature and animation data. Once in Roblox Studio, you can import the FBX as an `Animation` asset or a `Model`. While it sounds complex, it's totally achievable with practice. There are fantastic tutorials that break down Blender rigging and animation for Roblox step-by-step. I know it can seem daunting at first, but with a bit of dedication, you'll be seeing your custom characters move in no time. You've got this!
A: Common pitfalls include incorrect scaling, flipped normals, models appearing inside out, or missing textures. To avoid these, always apply transforms (Ctrl+A -> All Transforms) in Blender before exporting. Check your model's face orientation (Overlay -> Face Orientation) to ensure all faces are blue, indicating correct normals; if red, flip them (Alt+N -> Flip). Use FBX export settings with '-Z Forward' and 'Y Up'. For scaling, remember that Roblox units are studs, and a common practice is to scale your Blender models appropriately before export, perhaps by a factor of 0.01 if your Blender scene is in meters and you want 1 unit to be 1 stud. Consolidate textures where possible or handle them separately in Studio. Regular testing in Studio after each export helps catch issues early. These small checks save huge headaches later. Try this tomorrow and let me know how it goes.
A: Absolutely! While not strictly 'plugins' that directly link Blender to Roblox, there are several general Blender add-ons that significantly enhance a Roblox developer's workflow. The built-in **Mesh: LoopTools** is fantastic for cleaning up geometry and creating smooth surfaces. **F2** helps with efficient face creation. For creating tileable textures, an add-on like **Texture Atlas** can be very useful. Some developers also use add-ons for PBR texture creation or baking tools to optimize their assets. The **Blender to Roblox Plugin** is a popular community-made tool that simplifies the export process by automating many settings and even has features for importing Roblox meshes back into Blender. Exploring these can seriously streamline your creation process. I get why this confuses so many people, as there are so many tools, but these few really make a difference. You've got this!
Advanced / Research & Frontier
- Q: How can I implement custom physics and collision meshes for Blender models in Roblox Studio?
A: Implementing custom physics and collision meshes for Blender models in Roblox Studio is a fantastic way to optimize performance and ensure accurate interactions. Instead of letting Roblox calculate complex collisions on your high-detail mesh, you create a simplified, invisible mesh in Blender specifically for collision. Export this simplified mesh alongside your visual model, using a distinct naming convention (e.g., `_collision`). In Roblox Studio, you'd make this collision mesh `CanCollide` and `Anchored` (if stationary) and ensure its `Transparency` is 1.0, while setting your visual mesh's `CanCollide` to `false`. This approach significantly reduces the computational load, especially for intricate models. It's a bit more work up front, but the performance gains are absolutely worth it for complex environments or interactive objects. You've got this!
- Q: What are best practices for creating PBR (Physically Based Rendering) textures in Blender for Roblox?
A: Creating PBR textures for Roblox in Blender involves generating or painting several specific texture maps: Albedo (color), Normal (for surface detail), Metallic (for metallic surfaces), and Roughness (for how shiny a surface is). Blender's Cycles or Eevee render engines are excellent for previewing these. Ensure your UV maps are clean and non-overlapping. Export these individual texture maps as separate image files (PNG is common). In Roblox Studio, you'll import these textures and apply them to a `SurfaceAppearance` instance on your `MeshPart`. Using a program like Substance Painter or even Blender's internal texture painting can help create high-quality PBR maps. The key is consistent lighting during baking and accurate material values. This one used to trip me up too, trying to get the right look, but careful map creation is everything. Try this tomorrow and let me know how it goes.
- Q: How do I optimize really complex Blender scenes or models to run smoothly in large Roblox experiences?
A: Optimizing complex Blender scenes for large Roblox experiences is critical for preventing lag. Start with aggressive polygon reduction using decimate modifiers or manual retopology, aiming for the lowest poly count that still retains visual fidelity. Utilize texture atlases by combining multiple small textures into one larger image to reduce draw calls. Use instancing in Blender where appropriate for repetitive objects. Break down massive models into smaller, manageable `MeshParts` that can be loaded more efficiently by Roblox's streaming system. Implement level of detail (LOD) if possible by creating simpler versions of models that appear at a distance. Don't forget to remove hidden geometry or unnecessary data before exporting. It's a constant balance between visual quality and performance, but these steps make a huge difference. You've got this!
- Q: Can Blender be used for advanced character rigging and custom inverse kinematics (IK) for Roblox avatars?
A: Yes, Blender is incredibly capable for advanced character rigging and creating custom inverse kinematics (IK) for Roblox avatars. You can build complex bone structures, set up custom controls, and implement IK solvers to make animation much more intuitive and realistic. While Roblox Studio has its own rigging capabilities, using Blender allows for far greater precision and sophistication in your character's skeletal setup. You'll export your fully rigged and weighted mesh, complete with its armature, via FBX. In Roblox Studio, you might still need to connect the animation data and sometimes even rebuild constraints for full functionality, but the core rig created in Blender provides a powerful foundation for dynamic custom characters. It requires patience and a good understanding of Blender's rigging tools, but the results are truly outstanding. You've got this!
- Q: What are the best resources for learning advanced Blender techniques specifically for Roblox game development?
A: For advanced Blender techniques tailored to Roblox, you'll want to tap into a mix of resources. YouTube channels like TheDevKing, AlvinBlox, and other dedicated Roblox development communities often feature tutorials on advanced Blender workflows. Beyond Roblox-specific content, general Blender channels like Blender Guru or Grant Abbitt provide foundational skills that are invaluable. Also, check out the official Roblox Developer Forum; many experienced creators share advanced tips and techniques there. Online courses on platforms like Udemy or Skillshare, if they cover game asset creation, can also be a goldmine. Don't shy away from Blender's official documentation and community forums either; they're packed with solutions. It's about combining general 3D knowledge with Roblox's specific requirements. You've got this!
Quick Human-Friendly Cheat-Sheet for This Topic
- Download Blender Officially: Always get Blender from blender.org – it's free and safe!
- Use FBX for Exports: Stick to FBX (.fbx) for exporting models; it handles meshes, animations, and rigs best for Roblox.
- Apply Transforms Before Export: In Blender, hit Ctrl+A and choose 'All Transforms' to prevent weird scaling or rotation issues in Roblox.
- Check Your Normals: Make sure all faces are oriented correctly (blue side out!) in Blender before exporting to avoid inside-out models.
- Keep it Optimized: Aim for lower polygon counts and efficient textures for better performance in your Roblox games.
- UV Unwrap Everything: Properly UV unwrap your models in Blender so textures look perfect in Roblox.
- Test, Test, Test: Always import and test your Blender assets in Roblox Studio regularly to catch problems early!
A: Implementing custom physics and collision meshes for Blender models in Roblox Studio is a fantastic way to optimize performance and ensure accurate interactions. Instead of letting Roblox calculate complex collisions on your high-detail mesh, you create a simplified, invisible mesh in Blender specifically for collision. Export this simplified mesh alongside your visual model, using a distinct naming convention (e.g., `_collision`). In Roblox Studio, you'd make this collision mesh `CanCollide` and `Anchored` (if stationary) and ensure its `Transparency` is 1.0, while setting your visual mesh's `CanCollide` to `false`. This approach significantly reduces the computational load, especially for intricate models. It's a bit more work up front, but the performance gains are absolutely worth it for complex environments or interactive objects. You've got this!
A: Creating PBR textures for Roblox in Blender involves generating or painting several specific texture maps: Albedo (color), Normal (for surface detail), Metallic (for metallic surfaces), and Roughness (for how shiny a surface is). Blender's Cycles or Eevee render engines are excellent for previewing these. Ensure your UV maps are clean and non-overlapping. Export these individual texture maps as separate image files (PNG is common). In Roblox Studio, you'll import these textures and apply them to a `SurfaceAppearance` instance on your `MeshPart`. Using a program like Substance Painter or even Blender's internal texture painting can help create high-quality PBR maps. The key is consistent lighting during baking and accurate material values. This one used to trip me up too, trying to get the right look, but careful map creation is everything. Try this tomorrow and let me know how it goes.
A: Optimizing complex Blender scenes for large Roblox experiences is critical for preventing lag. Start with aggressive polygon reduction using decimate modifiers or manual retopology, aiming for the lowest poly count that still retains visual fidelity. Utilize texture atlases by combining multiple small textures into one larger image to reduce draw calls. Use instancing in Blender where appropriate for repetitive objects. Break down massive models into smaller, manageable `MeshParts` that can be loaded more efficiently by Roblox's streaming system. Implement level of detail (LOD) if possible by creating simpler versions of models that appear at a distance. Don't forget to remove hidden geometry or unnecessary data before exporting. It's a constant balance between visual quality and performance, but these steps make a huge difference. You've got this!
A: Yes, Blender is incredibly capable for advanced character rigging and creating custom inverse kinematics (IK) for Roblox avatars. You can build complex bone structures, set up custom controls, and implement IK solvers to make animation much more intuitive and realistic. While Roblox Studio has its own rigging capabilities, using Blender allows for far greater precision and sophistication in your character's skeletal setup. You'll export your fully rigged and weighted mesh, complete with its armature, via FBX. In Roblox Studio, you might still need to connect the animation data and sometimes even rebuild constraints for full functionality, but the core rig created in Blender provides a powerful foundation for dynamic custom characters. It requires patience and a good understanding of Blender's rigging tools, but the results are truly outstanding. You've got this!
A: For advanced Blender techniques tailored to Roblox, you'll want to tap into a mix of resources. YouTube channels like TheDevKing, AlvinBlox, and other dedicated Roblox development communities often feature tutorials on advanced Blender workflows. Beyond Roblox-specific content, general Blender channels like Blender Guru or Grant Abbitt provide foundational skills that are invaluable. Also, check out the official Roblox Developer Forum; many experienced creators share advanced tips and techniques there. Online courses on platforms like Udemy or Skillshare, if they cover game asset creation, can also be a goldmine. Don't shy away from Blender's official documentation and community forums either; they're packed with solutions. It's about combining general 3D knowledge with Roblox's specific requirements. You've got this!
Blender Roblox integration, 3D modeling for Roblox, Custom asset creation, Free game development software, Step-by-step download guide, Enhanced Roblox game development, Seamless asset pipeline, Unlocking creative potential in Roblox.
35


Get Blender Models To Roblox HOW TO MODEL Roblox Studio YouTube . Blender To Roblox Studio How To Import Blender Model Into Roblox With . How To Import Roblox Studio Models To Blender YouTube . Roblox Avatar To Blender Your Easy Guide . Roblox Blender B Quy T T O M H Nh 3D Nh Cao Cho Game Th V Ng I


Animate Your Roblox Avatar In Blender . Blender For Roblox Studio Blender Animation Roblox LTAX . Roblox Blender Animation Tutorial At Anglea Ramos Blog . How To Animate Roblox In Blender With 2 Rigs 2025 Tutorial READ DESC . How To Use Blender With Roblox At Blake Sexton Blog


How To Make Roblox Models In Blender H Ng D N T O M H Nh 3D Chuy N . Blender Roblox Rig Get Builders Club . Roblox Avatar To Blender Your Easy Guide . Animations Blender To Roblox Made Easy . Blender Rig Download Roblox At Louis Mitchell Blog


Roblox Avatar To Blender Your Easy Guide . Roblox Avatar To Blender Your Easy Guide . Animate Your Roblox Avatar In Blender . How Can I Animate Skinned Mesh R15 In Blender And Import Into Studio . Roblox 3D Models To Blender Tutorials Tips And Tricks Blender 2 1024x576


How To Import Roblox Models Into Blender 2026 YouTube . Animate Your Roblox Avatar In Blender 2 690x418 . Animate Your Roblox Avatar In Blender . How To Import Roblox Models Into Blender With Textures YouTube . Animations Blender To Roblox Made Easy


Animations Blender To Roblox Made Easy . Blender Roblox Creator Hub Workspaces . How To MODEL 3D Clothes Blender Roblox Studios YouTube . I Need Help Figuring Out How Blender Can Be Used For Roblox Games While . Roblox Studio How To Animate Roblox Character In Blender YouTube
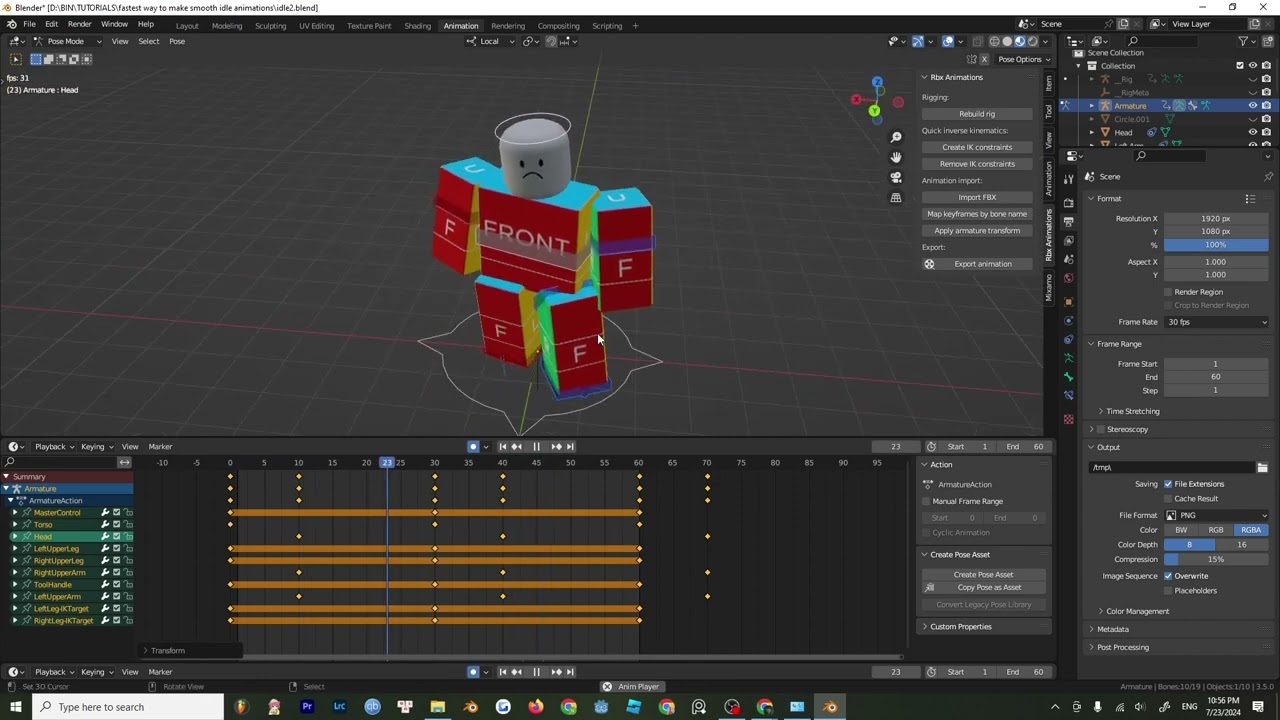


Fastest Way To Make Smooth Idle Animations In 5 Minutes Roblox Blender . Roblox Studio To Blender Modelling 2 0 How To Color And Import Your . Blender Rig Download Roblox At Louis Mitchell Blog Roblox R6 Blender Rig Link In Desc 3d Model Low Poly Animated Rigged Blend . How To Import Roblox Rig Blender YouTube . How To Make A Roblox Animation In Blender BEGINNERS 2023 YouTube